Note: Power BI Service and Power BI Online terms are used indistinctly, and they both refer to the same PaaS. Microsoft uses boths terms in its documentation.
This post will save you some time, I hope.
Yesterday I needed to do a connection test from our Power BI Service account to our AZ SQL Managed Instance via our public endpoint and, I had a minor issue, so I decided to write about it in case it could be helpful for someone.
First things first, if you start your research by looking for something similar to: “AZ SQL Managed Instance Public Endpoint Power BI”, you are already doing it wrong. You will probably find this link and end up reading the section Allow public endpoint traffic on the network security group. This is where it gets tricky because you will find this:

They are explaining how to add a new Network-Security-Group Inbound Rule that will allow the traffic from your Power BI Online account to your AZ SQL Managed Instance. Please note that they mention that you should “…select the Azure Cloud Service tag”, which seems to not exist, if you try to add the rule from the azure portal:

If you select the source Service Tag, you will see these options:
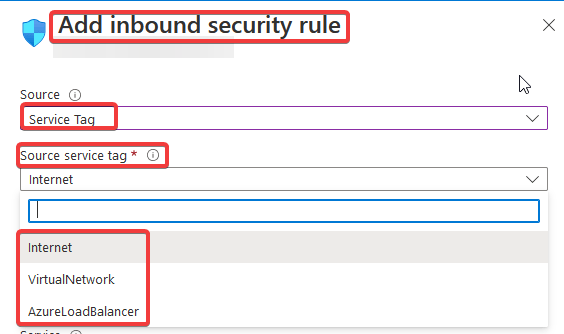
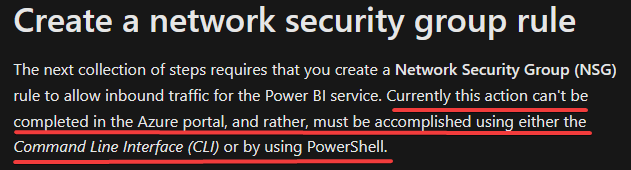
You will not find the service tag they mention in the documentation. You will be confused, and you will have to keep doing research in google. So, how can we add this rule to allow traffic from our Power BI Online account to our AZ SQL Managed Instance? The answer is in this link and you have to do this manually via PowerShell or the Command Line Interface (CLI). There is no way to do it via the azure portal as they mention it:
The next collection of steps requires that you create a Network Security Group (NSG) rule to allow inbound traffic for the Power BI service. Currently this action can’t be completed in the Azure portal, and rather, must be accomplished using either the Command Line Interface (CLI) or by using PowerShell.
So, to add the Network-Security-Group Inbound rule, follow these steps:
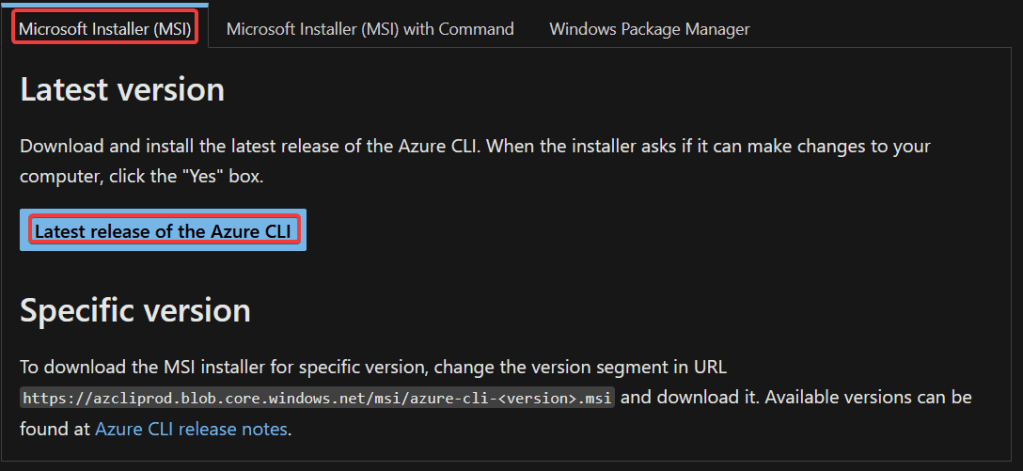
1. Download and install the Azure command-line interface (Azure CLI)
You can download the Azure CLI in this link. Just click the following button and the download will start automatically:
Follow the wizard, there is nothing to highlight about the install process.
2. Modify the reference script
Modify the highlighted variables, leave the others as they are.
#login to azure
az login

#set subscription that contains SQL MI instance
$subname = "mysubscriptionname"
az account set --subscription $subname

#set NSG rule for inbound PowerBI traffic

#update $RG to your resource group name
$rg = 'myresourcegroup'
#update $nsg to your Network Security Group name
$nsg = 'nsgresourcename'
# Name the NSG rule
$rule = 'allow_inbound_PowerBI'
#set the priority - this must be higher priority (lower number) than the deny_all_inbound rule
$priority = 400
#specifiy the service tag to use
$servicetag = 'PowerBI'
#specify the public endpoint port defined in step 1
$port = 3342
#set the rule to inbound direction
$direction = 'Inbound'
#set the access type to "Allow"
$access = 'Allow'
#Set the protocol as TCP
$protocol = 'tcp'
#Provide a description for the rule (max 140 characters)
$desc = 'Allow PowerBI Access to SQL MI for Direct Query or Data Refresh.'

#create the NSG rule
az network nsg rule create -g $rg --nsg-name $nsg -n $rule --priority $priority --source-address-prefixes $servicetag --destination-address-prefixes '*' --destination-port-ranges $port --direction $direction --access $access --protocol $protocol --description $desc
3. Run the reference script
I ran the script line by line, so, open PowerShell:

Run the first line of the script: az login. You will see the following message and your browser will pop up, so you authenticate:

Once you do that, just copy, paste and press Enter for the subsequent lines, one by one. You will not receive any type of confirmation as you are just creating variables that will be used in the last line of the code, in which you will create the NSG rule. Once you execute the last line of code, you should see something similar to the following:
{
  "access": "Allow",
  "description": "Allow PowerBI Access to the AZ SQL MI for Direct Query or Data Refresh. Created via PowerShell, not supported via the az portal",
  "destinationAddressPrefix": "*",
  "destinationAddressPrefixes": [],
  "destinationPortRange": "3342",
  "destinationPortRanges": [],
  "direction": "Inbound",
  "etag": "W/\"etagValue\"",
  "id": "/subscriptions/YourSubscriptionID/resourceGroups/YourResourceGroupName/providers/Microsoft.Network/networkSecurityGroups/YourNetworkSecurityGroupName/securityRules/allow_inbound_PowerBI",
  "name": "allow_inbound_PowerBI",
  "priority": 1300,
  "protocol": "Tcp",
  "provisioningState": "Succeeded",
  "resourceGroup": "YourResourceGroupName",
  "sourceAddressPrefix": "PowerBI",
  "sourceAddressPrefixes": [],
  "sourcePortRange": "*",
  "sourcePortRanges": [],
  "type": "Microsoft.Network/networkSecurityGroups/securityRules"
}
To double check the creation of the rule, go to the portal and check the inbound rules of the Network Security Group. You should see something like this:
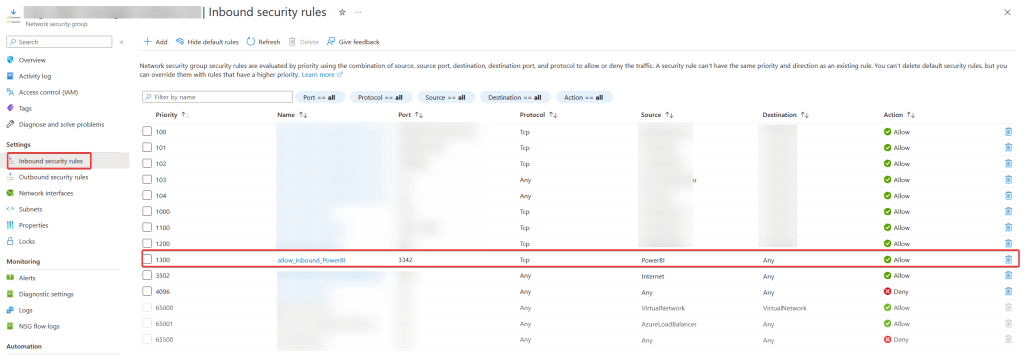
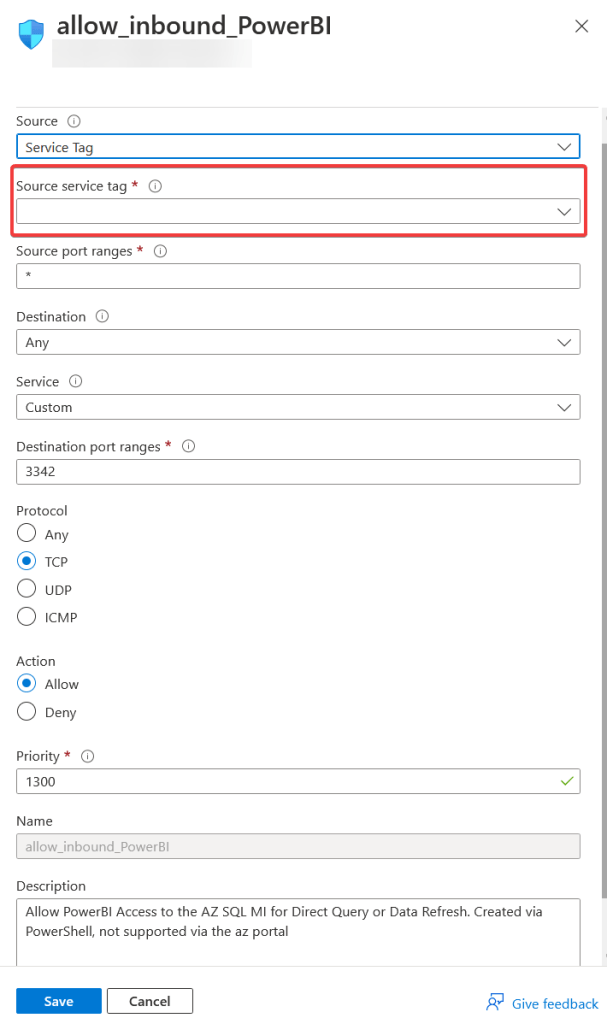
If you click on the rule, you will notice that the property Source service tag does not have any value in it. I’m assuming this is just something that Microsoft needs to fix on its front end. They probably just don’t have setup all the options in these drop-down lists, which means that if we would like to modify, let’s say, the Priority, you would have to do it manually as well via PowerShell or the Azure CLI.
This is it! Hope this has been helpful for you!

Leave a comment