
In the current project I’m working on, I had the need to zip an Az DevOps git repository and deploy it to an Az Storage Account. I needed to do it because we are using Az Batch Service to execute our main Python project from an Az Data Factory pipeline, and the way that we decided to copy the code to the Az Batch Pool’s node was by publishing it to the Az Storage Account and then copying it from there.
In case you are wondering, we didn’t use the Az Data Factory’s custom activity’s property folderPath to copy our main Python project to the Az Batch Pool’s node because of its behavior (and other reasons inherent to the way our Python project worked) when your project has a hierarchical folder structure; it will flatten it, and this could cause issues when you have files with the same name.
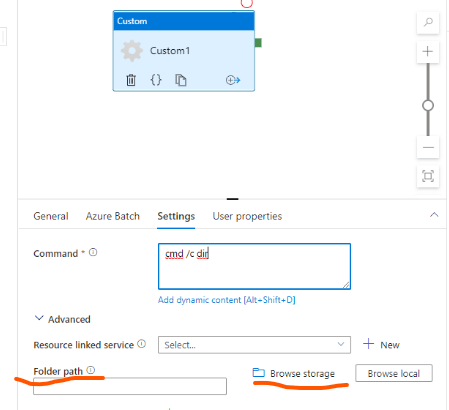
Our project had a complex folder structure, and we just didn’t want to adjust it to make it work in the Az Batch Pool’s node. This feature works better for simple projects with few files/libraries/modules, which is how we used it; we decided to copy a Python script to the Az Batch Pool’s node, and then execute it to copy our main Python project from the Az Storage Account to the Az Batch Pool’s node. Another option is that you simply execute the necessary CDM commands to copy your project from the Az Storage Account to the Az Batch Pool’s node. It all depends on the process you are building and your requirements.
I hope that short contextualization was enough to understand why I needed to deploy our Az DevOps git repository to our Az Storage Account. Below are the steps of how I did it and what things I considered to build the process.
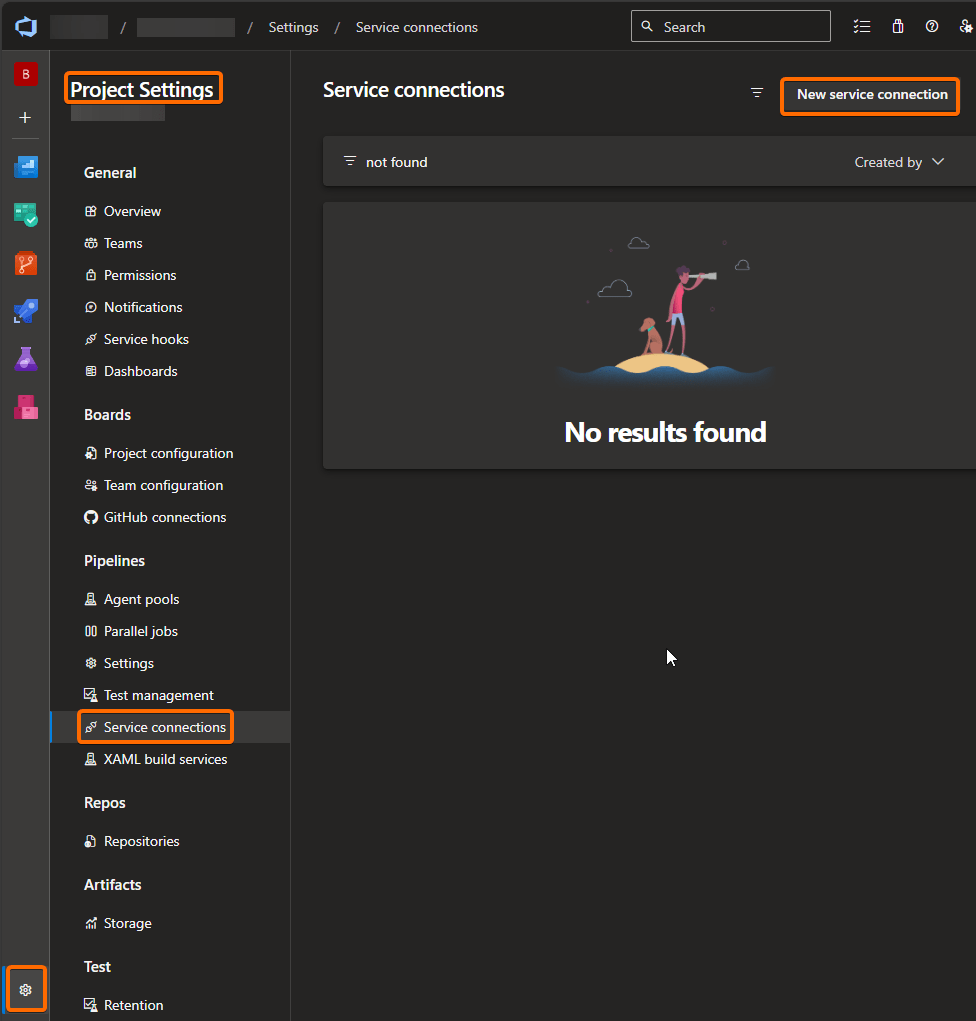
1. Create a Service Connection
To access an external service from a CI/CD pipeline, you must create a Service Connection. In my case, I created a Service Connection to access an Az Storage Account from a CI/CD pipeline, so it could deploy an Az DevOps git repository to a specific container of an Az Storage Account.
A Service Connection is created at the project level. To create one, follow these steps:
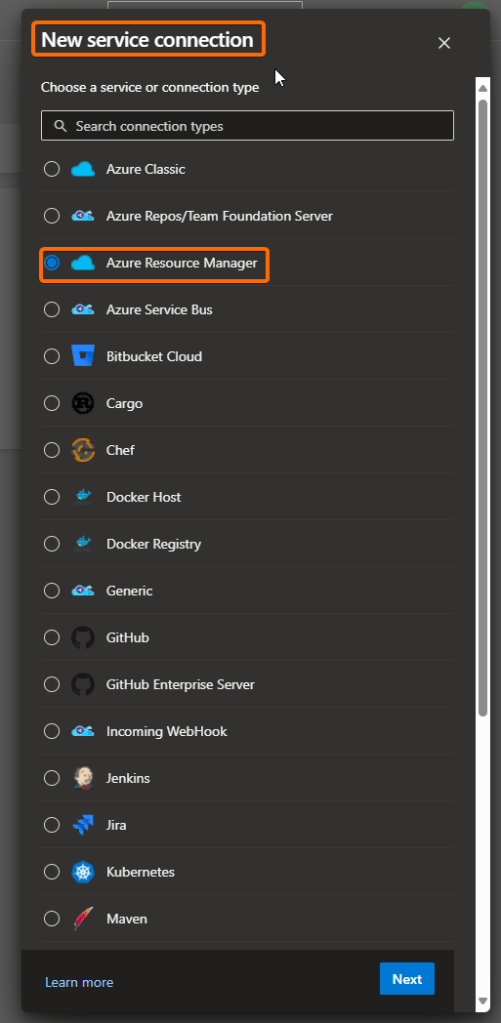
When you click on the button, you will be presented with a list of services or connection types. Since our example is focused on the creation of a connection to an Az Storage Account, which is in an Az Subscription, we have the following 2 options:
- Azure Classic service connection
- Azure Resource Manager service connection
We will select the latter option as this one offers the recommended and most secure approach regarding the way we will authenticate to our target Az Subscription/Az Storage Account.
To explore a bit more the different connection types available, please check out MS documentation about it.
From the different authentication methods available, we will select the Workload Identity federation (manual).
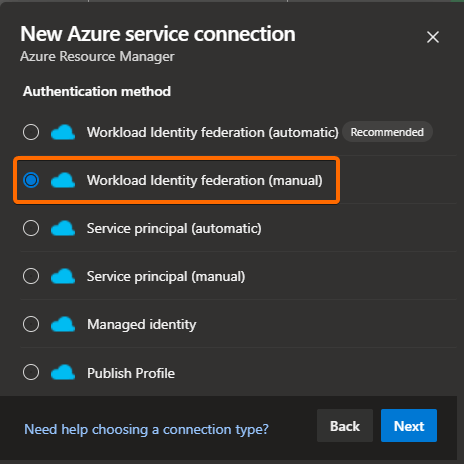
Do not use any of the automatic options as it will use your credentials. This means that your user must have enough permissions to access and perform any of the operations you will perform from the CI/CD pipeline. For this and other reasons, this is not a good practice from a security and maintenance standpoint. A more recommended approach, and the one that we will go with, is to use a user-assigned managed identity.
Also, we are using the identity federation option as it avoids the use of secrets, keys, passwords, and it has an extra security layer due to the setup you need to do between the Az DevOps Organization (your Az DevOps account/portal) and the Az Subscription owner of the target Az storage account.
For more details about this authentication method, please check out these 2 links: link 1 and link 2.
Once you have clicked on the Next button, you will see the next form:

Do not check the option Grant access permission to all pipelines, unless you need to. It is a better practice to assign the access permissions to the specific pipelines that will use the Service Connection.
Note: If you made a mistake with the name of the Service Connection, the best approach is to finish the one you’re creating, test it, and then recreate it from scratch as the renaming process might cause issues. You will get a warning when you try to rename a Service Connection.
For the next step of the Service Connection, see details below:
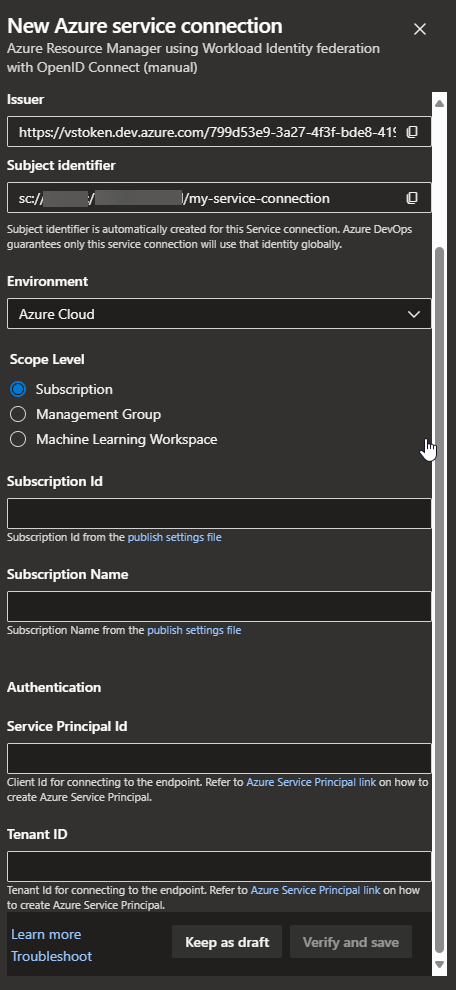
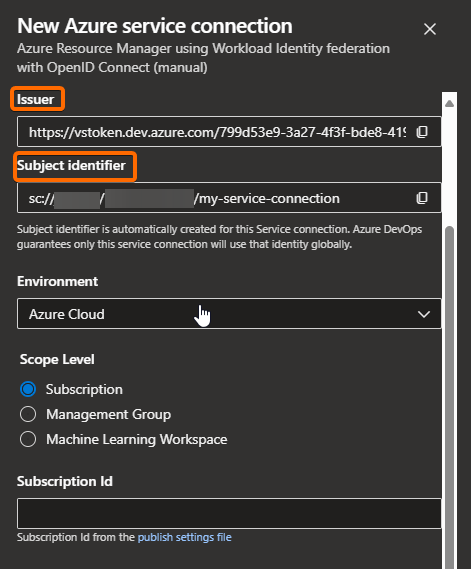
a. Environment: Select Azure Cloud.
b. Scope Level: Select Subscription.
c. Type the Subscription Id and Name which the Az Storage Account (target resource) belongs to.
d. Type the Tenant Id which the Az Storage Account (target resource) belongs to.
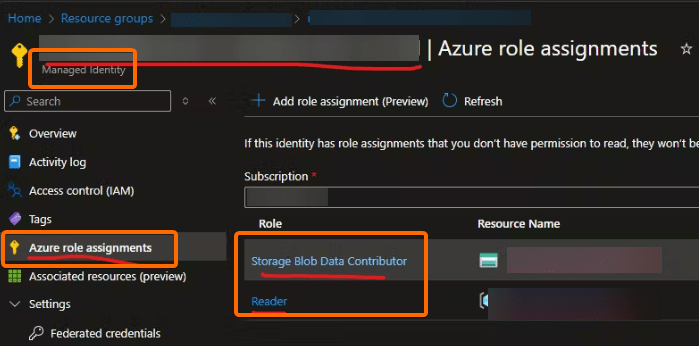
e. Type the Service Principal Id (Id of the user-assigned managed identity you should have already created). Below you can see the main points to consider about the user-assigned managed identity permissions:
- It must have the necessary permissions over the resource you will be accessing from the CI/CD pipeline. Otherwise, the creation of the Service Connection will fail.
- Storage Blob Data Contributor on the target Az Storage Account
- Reader on the resource group which the Az Storage Account belongs to
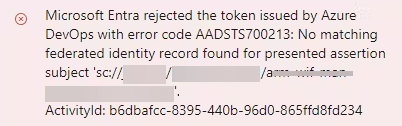
- It must have the identity federation set up with the Issuer and Subject identifier of the Service Connection. If this is not set up, you will get the following error:
- To set up the identity federation, you have to go the identity and add a new federated credential:
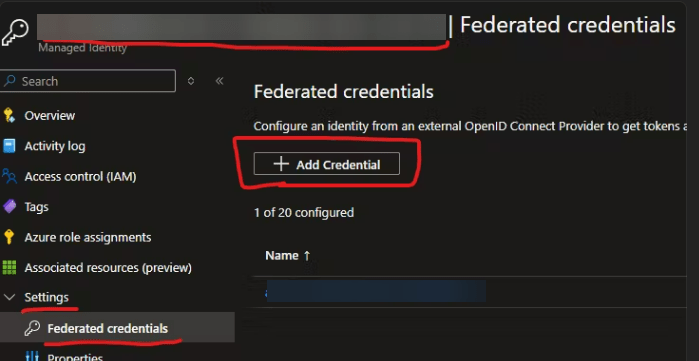
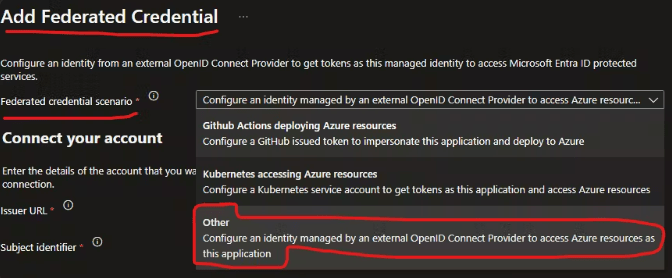
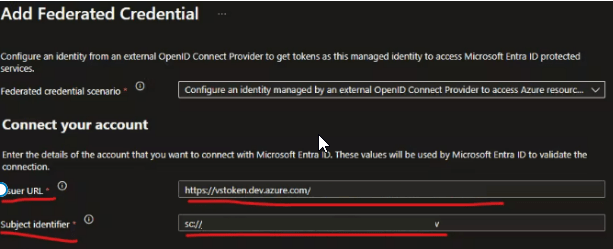
- Copy and paste the Issuer URL and Subject identifier properties from the service connection properties to the Federated Credentials form:
- On the Federated Credential details, you could name it as the Service Connection with a devops_ prefix (or something similar), so it is easier to track down which App/resource is using this user-assigned managed identity to access a resource within your Az Subscription.
- Click on the Add button, the federated credential should be set up with no issues.
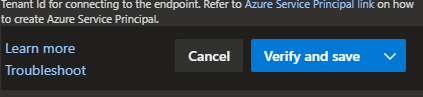
Now go back to the Service Connection setup and click on the Verify and save button. Since the Federated Credential was already set up, the verification should succeed.
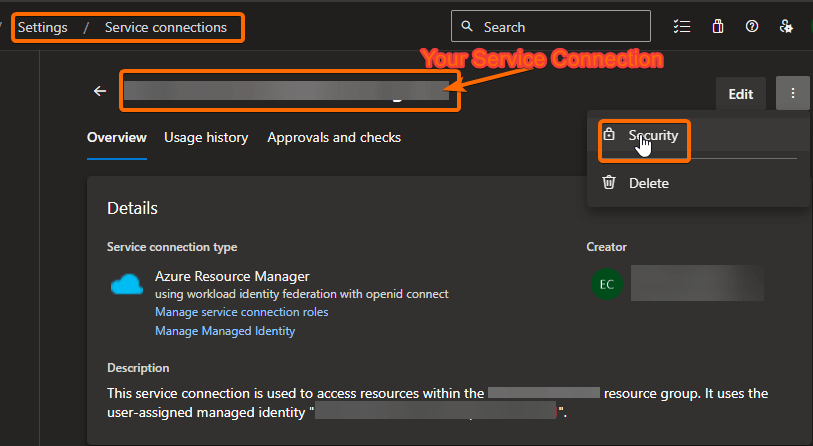
2. Assign permissions to the CI/CD pipeline to use the Service Connection
Click on the Service Connection and go to the security settings.

3. Create CI/CD pipeline to zip your repository and deploy it to an Az Storage Account
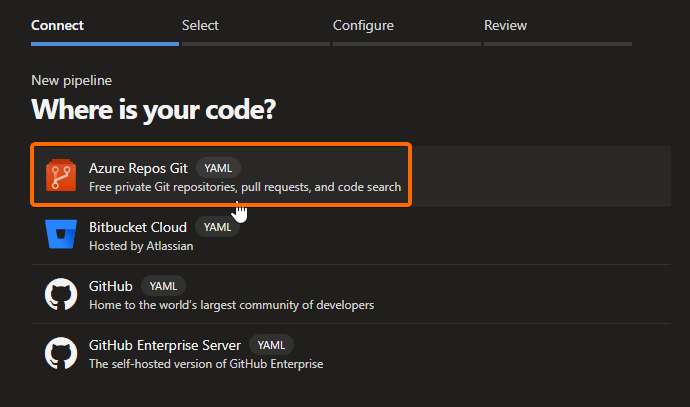
Go to your Az DevOps portal, and create a new pipeline:

In our case, we had our repo in Azure Repos Git:
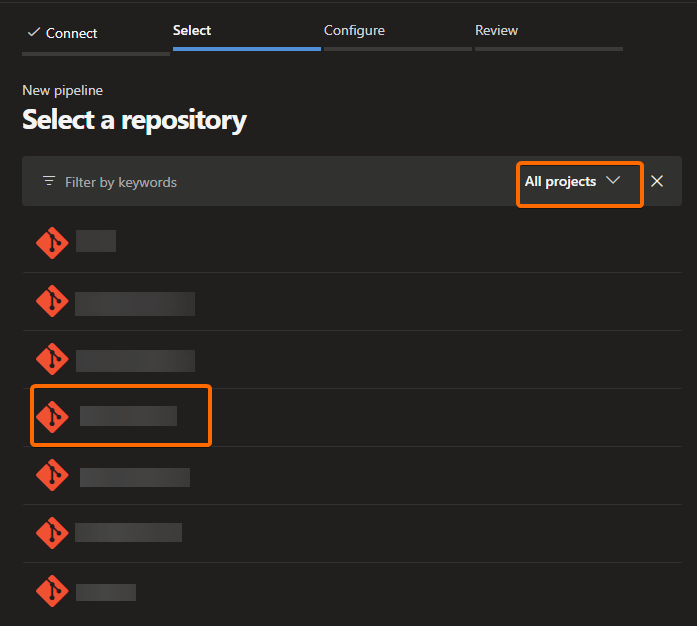
Look for your repo and select it:
Since we are doing this from scratch, we select the option below:

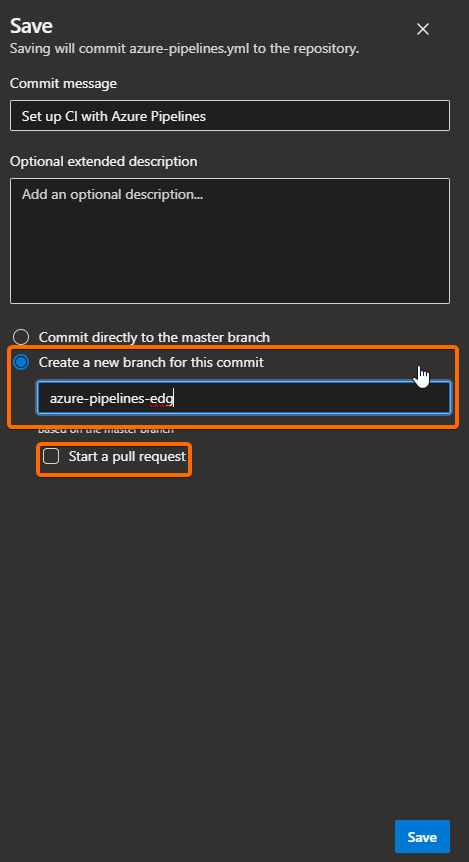
This will create a basic template for you to start the creation of your pipeline. Click on the Save button, uncheck the option Start a pull request (you can do that later and not now that you’re learning), and commit the changes to a new branch of the selected repository:
You can find the new pipeline here:

If you need to review or edit certain pipeline details, such as the name, the permissions, etc., you can do it here:

I renamed my pipeline to test-edg-deployment-pipeline for testing purposes. By default, when you create it, it will be named just as your repository name.
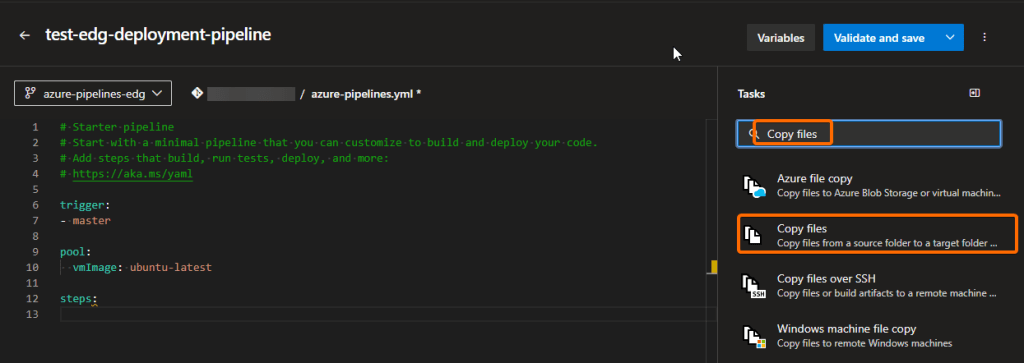
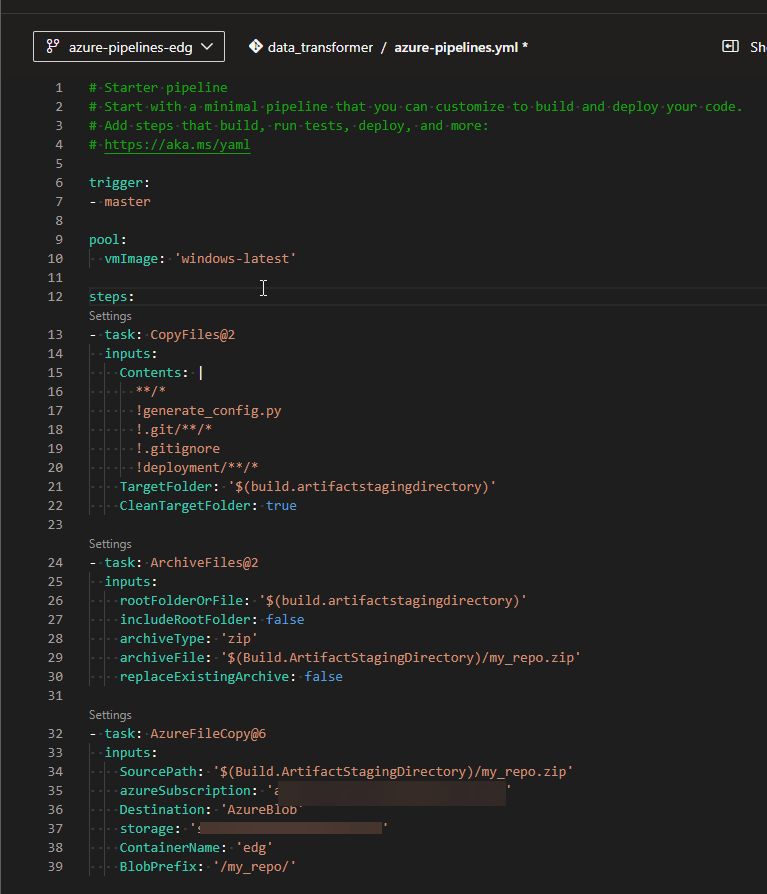
Now, go click on the Edit button. You will see the following (image below). Update the vmImage to “windows-latest” and delete the default tasks added when you create the pipeline (highlighted below), so you can add new tasks and set them up from scratch.

We will add the following 3 tasks:
- Copy files: We will use it to copy files from the repository to the Az DevOps Agent’s staging folder.
- Archive files: We will use it to zip the previously copied repository to the Az DevOps Agent’s staging folder.
- Azure file copy: We will use it to copy the zip file created in the previous task to the target Az Storage Account.
Let’s add the Copy files task. Type its name in the assistant’s search bar at the right side of the portal, and click on it to set it up:
By default, you will find it like this:
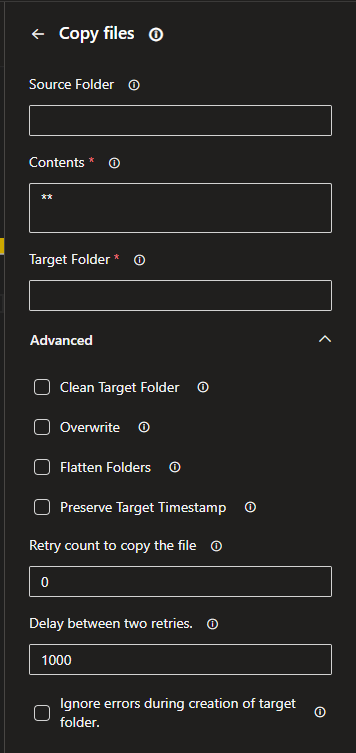
For our example, we will meet the following requirements:
- Files to copy will be the files of our repository.
- Copy all files the repository has.
- Exclude a file called “generate_config.py”
- Exclude the .git directory and its content.
- Exclude the .gitignore files (if any).
- Exclude the folder “deployment” and its content.
- The target folder will be the Az DevOps Agent’s staging folder.
- Delete any files that already exist in the target folder.
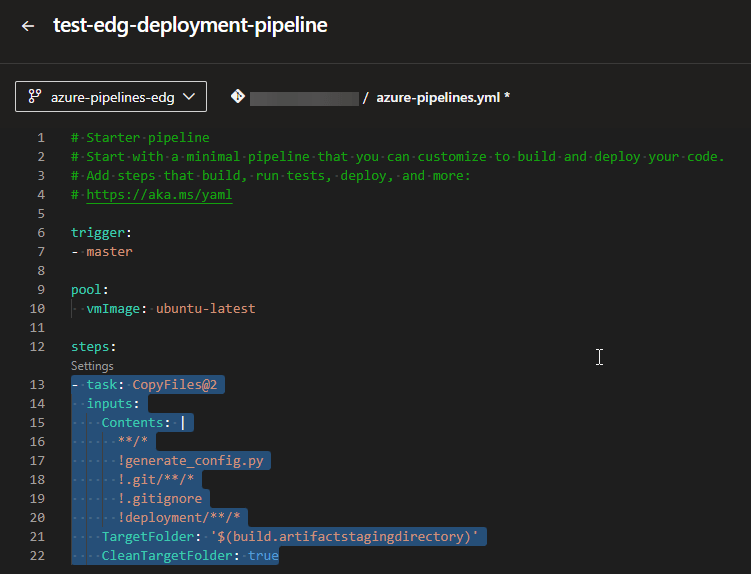
To get the desired setup, we will configure the task in the following way:

Click on the button Add, and you will see that it gets added to the pipeline yml file.
Now let’s add the Archive files task. Type its name in the assistant’s search bar at the right side of the portal, and click on it to set it up:

By default, you will find it like this:
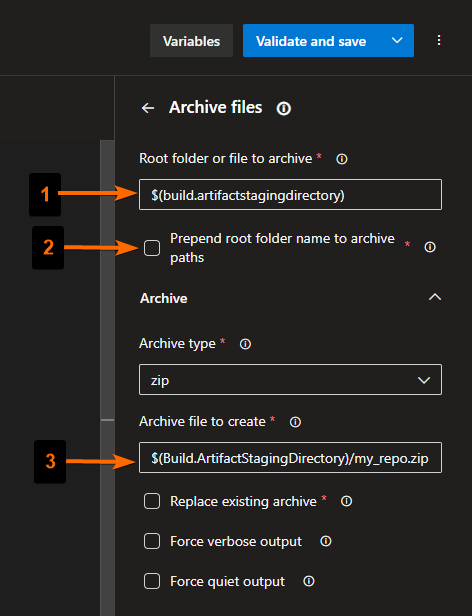
For our example, we will meet the following requirements:
- Files to compress as a zip should be the files copied to the Az DevOps Agent’s staging folder.
- We do not want the root folder of the repo to be prepended in the compressed file. For example, considering the folder structure “my_repo/my_folder/my_file.py”, we do not want the folder to be compressed like “my_repo/my_folder/my_file.py” (includes the root folder). We want the file to be compressed as my_repo.zip and the structure of it like “my_folder/my_file.py”.
- The final compressed zip file should be created in the Az DevOps Agent’s staging folder and its name should be “my_repo.zip”
To get the desired setup, we will configure the task in the following way:
Click on the button Add, and you will see that it gets added to the pipeline yml file.
Now let’s add the Azure file copy task. Type its name in the assistant’s search bar at the right side of the portal, and click on it to set it up:

By default, you will find it like this:
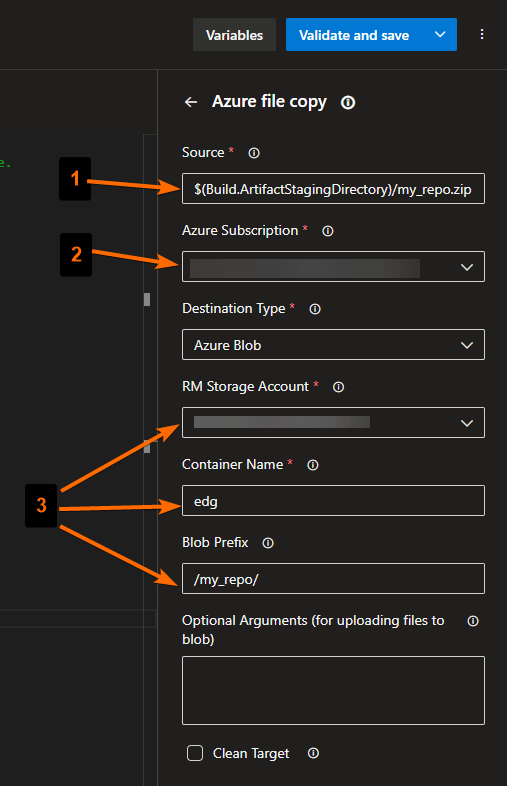
For our example, we will meet the following requirements:
- Compressed zip file should be the zip file we created in the previous task in the Az DevOps Agent’s staging folder (“my_repo.zip”).
- We should use the Service Connection we created and has all the necessary permissions to copy the zip file to the target Az Storage Account.
- The zip file should be copied to a folder called “my_repo” within a container called “edg”.
To get the desired setup, we will configure the task in the following way:
Click on the button Add, and you will see that it gets added to the pipeline yml file.
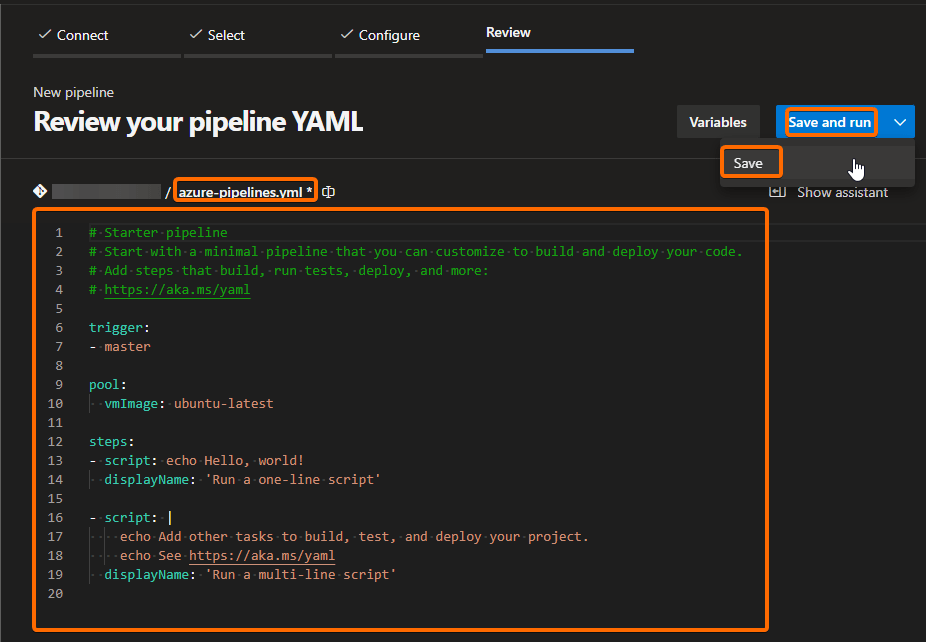
The complete yml file should look like below:
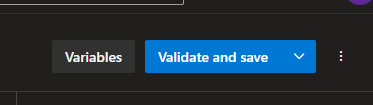
Then click on the Validate and save button at the right-upper corner, and then save.
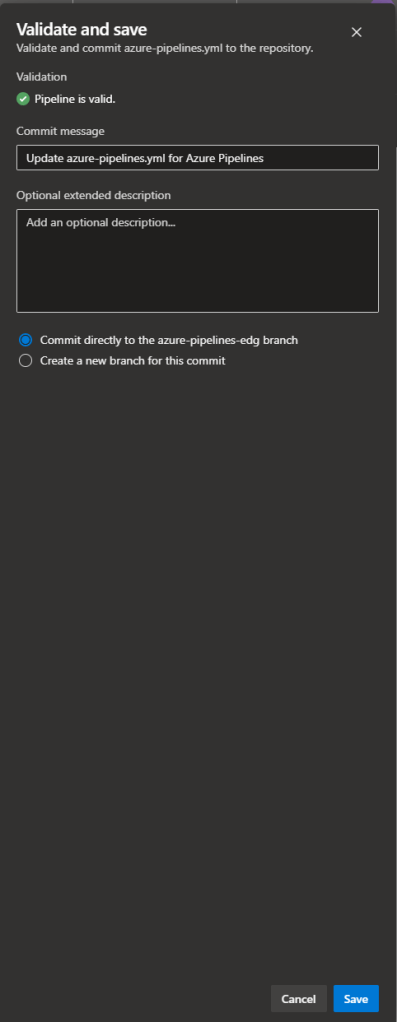
To test the pipeline, click on the button Run.

You might get the following permissions error. If so, just click on the View button and approve it.

The job should start right away once the permissions has been approved.
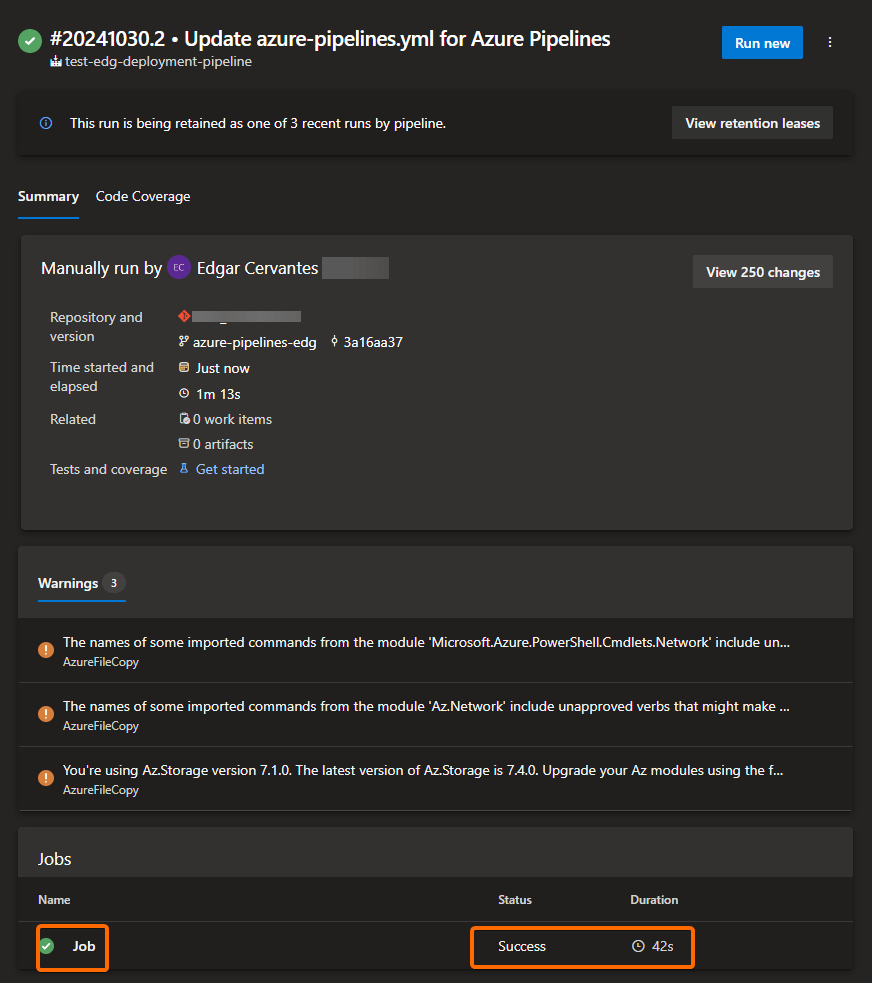
The pipeline should have finished successfully:

This is it folks, I hope you learned from this post and that it saved you some time googling how to do this!

Leave a comment